Disclosure: Links marked with * are Affiliate Links. As an Amazon Associate, I earn from qualifying purchases if you decide to make a purchase through these links – at no cost for you!
Climbing anchors are used for securing during climbing and mountaineering. They prevent you from slipping and falling into the depths. Meanwhile, they are available in a wide variety of designs.
It is important that you pay attention to quality when buying anchors – after all, your life depends on their condition. In this article, you will learn what types of climbing anchors you can choose from and what you have to pay attention to when using them.
In total there are 2 basic types of climbing anchors:
- Composite anchor: The anchor is glued into the rock with cement.
- Drill anchor or Expansion Bolt: The anchor is fixed by spreading a wall dowel.
(source: outdoor-magazin)
The History of Climbing Anchors
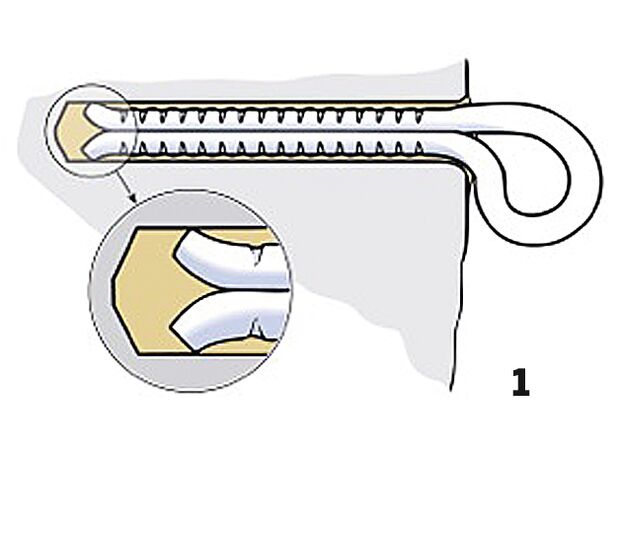
The climbing anchors were first used in 1944 at the Wilder Kaiser. At that time they were the so-called pin drill anchors. They consisted of a square, which was driven into the round drill hole. However, in terms of safety, they still had serious defects. Today they are no longer used.
Finally, in the 1970s, the crown drill anchor was introduced. This is an anchor system made of robust, hardened material. The crown is used for drilling. However, the drill hole must not be too deep, otherwise the cone will not expand the dowel crown.
If there is then a pull to the outside, maximum strength is no longer given. In spite of this deficiency, this climbing anchor is still in use today.
After that, standard-compliant systems became generally accepted for climbing. They comply with the EN 959 standard and have become reliable fixed anchors in sport climbing.
These Types of Climbing Anchors are Available
Climbing or drilling anchors are generally divided into two categories. These are composite anchors and mechanical drill anchors. The latter can also be divided into positive and frictional locking systems.
The latter variant maintains itself in the borehole through the expansion pressure by creating an explosive effect. The positive-locking model, on the other hand, is free of expansion pressure. Together with the rock, this forms a toothing which can be secured by a thread or an undercut system.
Composite anchors – also known as chemical anchors – are anchored in the borehole with quick-setting cement or a two-component mortar.
The Drill Anchor Standard at a Glance
The following properties must be provided by climbing anchors that comply with the European Drill Anchor Standard EN 959:
- Corrosion resistant material: the majority of anchors are therefore made of non-galvanized stainless steel
- the anchoring is independent of the borehole bottom
- the axial tensile strength is over 1500 daN: this is the tensile strength to the outside
- the radial tensile strength is over 2500 daN: it describes the downward pull
A reform of this standard will also come into force soon. It also requires a minimum embedment depth for climbing anchors. The minimum embedment depth for the different types of drill anchors is as follows:
- Composite anchor: at least 70 millimeters
- mechanical drill anchor systems: the minimum depth is five times the drill hole diameter
- Expanding dowel systems at least 70 millimeters
An Overview of the Most Important Facts about the Use of Composite Anchors
This category includes the classic Buhler as well as the composite anchor with the two-component mortar. A problem arises with these systems when using the composite mortars used to fix the anchors. These are all corrosive. Therefore, you should wear gloves and glasses for this project.
Also bear in mind that not all bonding mortars are suitable for axial tension. In this respect, pay close attention to the instructions in the mortar’s operating manual.
You should also keep the expiration date in mind. If the mortar is too old, it will not be able to harden completely – this also applies if you store it too warm.
If the anchor is too short, you have to expect a much lower strength. Note that the composite anchor must be anchored at least 70 millimeters deep in the rock to ensure sufficient grip on both radial and axial lines.
If it is a soft stone such as sandstone, you have to sink the anchor even deeper into the rock. If you are using mortar glass cartridges, make sure that the cartridge and anchor lengths match.
Pay Attention to the Following when Drilling
The rock must have a compact structure to ensure durability. There should be a distance of at least 15 centimeters from cracks, edges and holes. Thus, the distance between two drill anchors must be at least 30 centimeters.
The drilling should be perpendicular to the rock surface. In this way, an optimal application of force into the rock takes place. This also gives you the maximum strength. The diameter of the borehole depends on the maximum shaft diameter of your anchor. Simply add 1.5 to 2 millimeters to the latter value.
The depth of the drill hole should correspond to the shaft length including an additional 5 millimeters.
Clean the Drill Hole
If you are using a composite mortar, it will interlock with the help of micro-breaks in the wall of the borehole. These must not be clogged with drilling dust – otherwise the mortar will not work. Blow out the hole several times in advance with a blow-out nozzle.
You should also clean it afterwards with a round brush. Then you can fill the hole with either a mortar glass cartridge or cartridge mortars. You should always discard the pre-run because the mixing ratio is not yet correct.
Place the Anchor
In the next step you can insert the composite anchor. If you have a mortar glass cartridge, you simply hit it into the drill hole with a hammer. If you use a cartridge mortar, you can simply press the anchor into the rock hole with your hand.
Then align the anchor, smoothing the excess mortar with a spatula. Before you use the anchor, you must let the mortar dry out. Please note the drying time in the operating instructions.
After this period the anchor must be checked for strength. It is best to use a low torsion load for this purpose – the mortar is always most sensitive to this.
This is How You Proceed When Using Mechanical Anchors
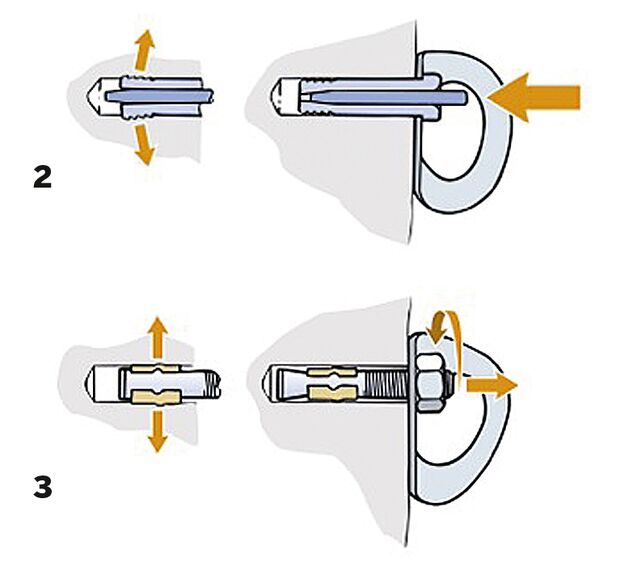
Mechanical anchors have the advantage that you can load them immediately after insertion. This is why they are preferred for first-time ascents. Also their installation is easy.
Form-Fit Systems
A distinction is made here between the undercut anchor and the screw anchor. The former variant is free of expansion pressure, which means that there is no explosive effect on the surrounding stone.
You can load this anchor on the spot. However, its installation requires a large drill hole diameter. In addition, you have to expect higher costs when buying it. During installation you have to keep a torque.
The screw anchor is easy to use. You only have to drill a small hole for its installation. The screw is then inserted into this hole. At the same time the tip of the screw cuts a thread into the rock.
This creates a stable form closure. You can also load this anchor immediately after its installation. However, the screw anchor has a comparatively high screw-in resistance. You can therefore only use it in medium-hard rocks such as dolomite and limestone.
In case of gneiss or granite, the screw could be damaged. If the stone is too soft, however, there is not enough strength.
Frictional Systems
This category includes express anchors and drop-in anchors. The former system is the anchor that is most widely used today. This is not surprising – it is easy to install and on top of that it is cheap.
However, the nut must not be overtightened. The torque must therefore always be observed during assembly
The hammer-in anchor can also be easily attached. You only need a drill and a hammer to attach it. However, the setting depth in combination with the high expansion pressure is comparatively small. In addition, you have to reckon with comparatively high costs when buying this model.
The Following Points Must be Considered during Installation
First you have to drill a hole between 8 and 14 millimeters. For the express anchor you have to choose a slightly greater depth. This gives you the opportunity to sink the anchor into the rock – this is especially advantageous if the anchor is not placed correctly.
you should be careful not to widen the hole too much by using the drill several times. This is at the expense of durability. You should also clean the drill hole of the mechanical anchors by blowing it out – however, such a thorough cleaning as with the composite anchors is not necessary.
You should definitely install expansion anchor systems in solid rock. Because in this case the blast load also acts on the rock. In addition, you must ensure that the edge and axial distances are observed. The distance between the drill hole and cracks, edges and holes must not be less than 15 centimeters. The distance between two drill anchors is therefore also at least 30 centimeters.
How to Set the Anchors
First you insert the anchor into the drill hole, then you drive in the expansion pin with the hammer. This requires some skill, as you must not hit the anchor tab during this process. To drive in the anchors, you insert the anchor tab and nut. By tightening the latter you achieve the spreading effect.
However, caution is advised here. If the clip has already been tightened over the cone, you must not tighten the nut any further. In this case the system can easily be overtightened. Please note the torque specified by the manufacturer. This is usually between 20 and 60 Nm. If my expansion takes place when tightening the nut, the drill hole is too large.
must not use the anchor in this case because there is not sufficient stability for axial load. You can also use a torque wrench for this step, but this is optional.
To insert the undercut anchor you need an undercut drill and a drift bit. After drilling the hole, you run the drill in a circle. Then you put the anchor into the hole and drive the sleeve over the cone with a chisel. Now you can attach the anchor tab.
If you use a screw anchor, it cuts a thread into the rock. The width of the drill hole must correspond to the diameter of the screw shaft without thread. In addition, sufficient depth must be ensured. Before inserting the anchor, you have to blow out the hole. Screw anchors are the best choice for medium hard rocks like dolomite and limestone.
Conclusion
If you follow the instructions described, you can safely attach and use the climbing anchors. Always make sure that the products used comply with the applicable EU standard. In this way, you guarantee the safety of the athletes.
Attention: You have to take care of your safety when climbing! The information on climbtheearth.com only helps you to learn. Before you climb, you should make sure that you have been properly instructed by an expert and that you follow all safety precautions.
Disclosure: This website is the property of Martin Lütkemeyer and is operated by Martin Lütkemeyer. Martin Lütkemeyer is a member of the Amazon Services LLC Affiliate Program, an affiliate advertising program designed to enable Web sites to earn advertising revenue through advertising and linking to Amazon.com. Links marked with * are affiliate links.
