Disclosure: Links marked with * are Affiliate Links. As an Amazon Associate, I earn from qualifying purchases if you decide to make a purchase through these links – at no cost for you!
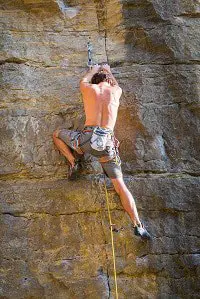
Bouldering and top rope climbing are fun, but if you want to take your climbing skills to the next level, you can’t get past lead climbing (what is lead climbing? > see the first paragraph).
Lead climbing can be a lot of fun and exciting. But it can also be frightening. The risk is slightly higher than with top rope climbing, as the drop depth is higher before the rope catches you. The more you prepare yourself mentally and physically, the more fun you will have. Good preparation is essential to advance safely.
How to lead climb outdoors correctly and safely? The basic rule is that you should not leave out a hook or anchor and must be spotted by your partner on the ground up to the first hook (the belayer is standing under you with raised arms to catch you if you fall).
Generally, more attention is required and before difficult spots, you should always take a short break to chalk.
In this article, I will tell you what techniques you need to lead climb and what equipment you will need.
What is Lead Climbing?
 Have you ever wondered how the climbing rope gets up the mountain when there’s no path to the top? Free climbing (climbing without belaying) is not the answer, but lead climbing is!
When lead climbing, you climb up a wall in which only anchors are attached for safety. As you climb the wall, you hook carabiners to the anchors and clip in your climbing rope to be belayed from below by your partner.
Unlike top rope climbing, the climbing rope does not run from the climber up to the top and then down to the belayer, but from the climber through the carabiners to the belayer.
Lead climbing becomes more difficult if you also attach the anchors yourself. For this, there is special equipment. Since you only hook yourself into the next anchor and secure yourself there, you fall further when lead climbing than when climbing top rope. If you fall directly at the next anchor, you would at least drop the distance from this to the last anchor plus the same distance because of the climbing rope.
Example: If the distance between two anchors is 1 m, you would fall 2 m. Since the climbing rope is elastic, the fall is even a little longer.
For this reason, you should spot the climber until he reaches a safe height. You should also practice falling and belaying in a climbing hall.
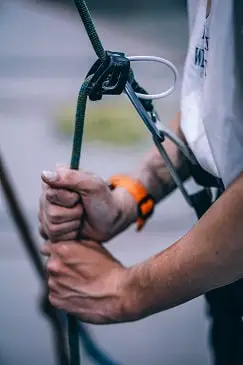
Methods for Clipping the Climbing Rope with One Hand
Before you can lead climb, you first need to know how to clip the climbing rope properly into the next anchor. It is best to practice the right techniques on the floor before you try it on the wall. There are basically two methods for clipping:
- Snap-lock Method: With the snap-lock method, you grab the climbing rope between your thumb and index finger. With your middle finger, grab the carabiner at its lower end. Then you can clip the climbing rope with thumb and index finger through the snap-lock. This method is particularly suitable if the opening of the carabiner is facing you.
- Squeezing Method: Here you put the climbing rope loosely over your index finger, grab the carabiner on the other side with your thumb and “squeeze” the climbing rope through the snap-lock into the carabiner. This method is particularly useful if the opening of the carabiner points away from you.
Clipping: Carabiner to Climbing Rope Orientation
To prevent the climbing rope from slipping out of the carabiners or getting damaged by scratching, it is very important to pay attention to the correct orientation of the opening of the carabiners.
Basically, you have to orientate the opening of the carabiner always in the opposite direction of your climbing direction. If you climb to the left, the opening must point to the right.
You must also avoid back-clipping.
When back-clipping, the climbing rope leads from the front to the back through the carabiner. This can be very dangerous, as the rope can fall out of the carabiner by itself if the carabiner/climbing rope orientation is not correct.
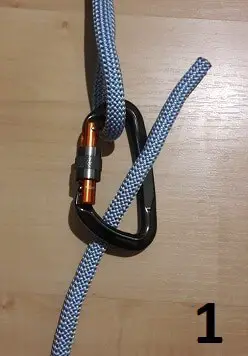
Image 1 shows the correct way to clip your climbing rope. The climbing direction is to the right and the carabiner opening to the left. The rope leads from the back to the front through the carabiner.
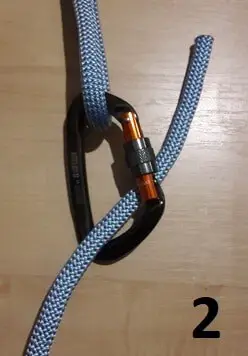
Image 2 shows the wrong way to clip your climbing rope. The orientation of the opening is in climbing direction and the rope was clipped incorrectly – i.e. “back-clipping” from front to back.
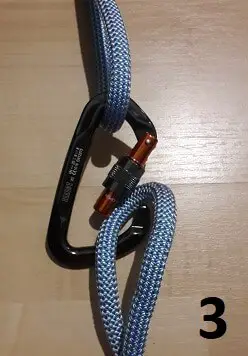
Image 3 shows why “back-clipping” can be so dangerous: although a lockable carabiner was used here, it is usually a normal carabiner. If the opening points in the direction of climbing and the climbing rope leads from the front through the carabiner to the back, the rope can push the carabiner open during a fall and release completely on its own.
Practice Lead Climbing with Top Rope Climbing in the Climbing Hall
The best way to practice lead climbing is to practice in the climbing hall on the top rope. You are perfectly secured by the safety rope from above. So you can fully concentrate on the technique of lead climbing.
Again, make sure you use both methods for clipping in the climbing rope. You can also try out how you can free a hand most efficiently to have it free for clipping. Sometimes it is not easy to find a comfortable position on the rock face where you have one hand to spare. If you practice this in advance, it will be easier later.
The most efficient way to clip the climbing rope is when the anchor is at about hip or chest height. If the anchor is higher, you may feel safer, but you have to stretch too much to reach it and waste your strength. If the anchor is lower, the potential drop height and thus the risk would be higher.
You will quickly notice that it is most comfortable when your arm you are holding on to is stretched out. This saves you energy and allows you to climb longer.
The better you get, the more difficult routes you can climb in the climbing hall. This will prepare you well for outdoor situations. At first you should choose a difficulty that is far below your level to familiarize yourself with the technique and safety aspects. Then you can slowly but steadily increase the difficulty.
How to Belay a Climber during Lead Climbing
 The belaying partner in lead climbing has the responsibility of catching the climber in case he falls. When lead climbing, much higher forces are acting when falling than when top rope climbing. The climber just falls deeper.
The idea is that as the climber’s belaying partner, you will catch his fall as gently as possible. This is not only more comfortable and safer for the climber – the rope will also thank you for it, as it has less to absorb from the fall.
At the end of the fall, you have to cushion the fall by not being a static anchor. If you held the rope tight and braced yourself against the pull of the rope, you would do the opposite of a gentle catch.
If the climber is about to fall into the climbing rope, give him a little more rope and jump up a little. The climber’s momentum will pull you up a bit, so you have to be prepared to bounce your feet off the wall. Always look upwards as much as possible to see falling stones or the like.
If the climber is much heavier than you, you jump less up. If you are the heavier one, you have to jump higher to make up for the difference.
How to Take a Fall while Lead Climbing
The most important thing is to realize that a fall is normal and usually unavoidable. Not only do you have to train your climbing techniques to minimize the risk of falling, it is just as important to know how to fall correctly. That’s why we practice it in the climbing hall – more about this in the next section (clip drop method).
The first rule of falling is that you shouldn’t push yourself too far out. If you push yourself too hard off the wall when falling for fear of rubbing along the rock, you hit the wall again with the same force. The risk of injury is unnecessarily high. Feet, knees, hands and in the worst case the head can be injured. So push yourself slightly away from the wall, if at all, so as not to hit your knees on the rocks when you fall.
If you are exhausted or already know for some other reason before the fall that you will drop, let the belayer on the ground know so that he can prepare.
Before a challenging part, you should always make sure that a potential fall would be safe. Make sure that the climbing rope is not tangled anywhere.
Falling Practice for Lead Climbing – Clip Drop Method
The biggest challenge you face while lead climbing is fear of falling. That’s why you should practice it in a controlled environment!
This is exactly what the clip drop method is for. With this method, you climb up a wall and every time you clip your rope into the next anchor, you drop! Your belayer should obviously know what you are doing so that he can prepare himself and is not constantly shocked.
At first, every fall will trigger an adrenaline rush. But if you are persistent and learn to deal with such falls better and better, you become more and more self-confident and a fall may even be fun.
However, the falls should never be longer than two metres, as otherwise the rope will be stressed too much and would have to be replaced sooner. You should only use the clip drop method in a climbing hall, otherwise you will unnecessarily wear out the elaborately placed anchors in the rock. In a climbing hall, it is also wise to let the staff know what you are doing, so that they are not constantly alarmed.
And of course you should only practice falling on straight or overhanging routes to avoid hitting anything.
Essential Equipment for Lead Climbing
 Since it is especially important to use safe equipment when lead climbing, I have listed all the essential equipment here. Among them are of course the normal things you need for climbing and special equipment for lead climbing.
Normal Climbing Equipment
- Climbing rope* – long enough for the chosen route
- Climbing helmet*
- Climbing harness*
- Climbing shoes*
- Chalk* + chalk bag*
- Belay device*
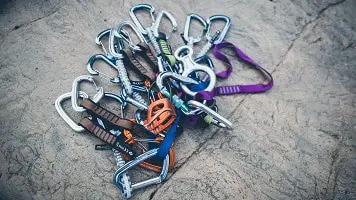
Lead Climbing Equipment – Anchors
- Cams*
- Quickdraws* (Two interconnected carabiners. One for the anchor, one for the climbing rope) – of these you need at least as many as there are anchors on the wall! Your harness will be full of it at the beginning.
Optional equipment
Here are some helpful links about climbing equipment:
- Climbing equipment list. What do I need for climbing?
- How to Choose Rock Climbing Shoes?
- How to Choose a Rock Climbing Harness?
- How to Choose a Rock Climbing Rope?
- How to Choose a Rock Climbing Helmet?
- How to Choose a Belay Device? Guide & best of 2018
Lead Climbing Risks
Lead climbing is more dangerous than top rope climbing. You fall deeper and you are highly dependent on how well you take care of your safety. If you use carabiners incorrectly or set a shaky anchor, the climbing trip can end badly. Here are a few tips to minimize the risk before and during climbing:
- Start lead climbing with easier routes than you are used to. Since lead climbing is technically and mentally more demanding than normal top rope climbing, you should start with easy climbing routes.
- Both the climber and the belayer on the ground must prepare for a fall and check their equipment before any difficult spots. The climber should be careful not to get tangled in the climbing rope in the event of a potential fall.
- Every time you clip, make sure you use the right technique. Better check three times than risking back-clipping.
- You should also check each anchor to see if it is strong enough to catch you when you fall.
Attention: You have to take care of your safety when climbing! The information on climbtheearth.com only helps you to learn. Before you climb, you should make sure that you have been properly instructed by an expert and that you follow all safety precautions.
Disclosure: This website is the property of Martin Lütkemeyer and is operated by Martin Lütkemeyer. Martin Lütkemeyer is a member of the Amazon Services LLC Affiliate Program, an affiliate advertising program designed to enable Web sites to earn advertising revenue through advertising and linking to Amazon.com. Links marked with * are affiliate links.
