Disclosure: Links marked with * are Affiliate Links. As an Amazon Associate, I earn from qualifying purchases if you decide to make a purchase through these links – at no cost for you!
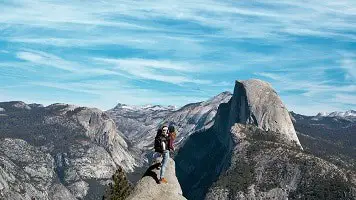
Whether you want to challenge yourself physically or just seeking a new thrill, rock climbing could be the next adventure that you consider. Not only does it demand a great deal from your body and keep you fit, but the successes are extremely rewarding. By the end of the climb, you could be sitting on top of the world and witnessing all of its natural beauty. Some of the most scenic views can be found atop the world’s most intense rock formations. It’s a view shared by few. However, everyone has to start somewhere, and if you’re thinking of starting up rock climbing, then there are a few terms you should be made aware of before you hit the stone. The chief of those is the concept of rock climbing rating systems. This article will inform you everything you need to know about rock climbing rating systems and how it can not only save your life but get you started on your next adventure.
The Rating System’s Origins
The Rating System has its origins from a group called the Sierra Club. The club is still functional today, albeit, over the years, their interests and duties have changed here and there. It was originally founded in 1892 by John Muir, a Scottish-American who was interested in preserving the outdoors. Thus, the Sierra Club was devoted to ensuring that the environment was kept preserved and activities performed in the outdoors was done so safely and with little impact on the environment. They are also responsible for eventually creating the Yosemite Decimal System, which is the modern rock climbing rating system that is used today.
Glen Dawson and Royal Robbins, two members of the Sierra Club, went rock climbing at Tahquitz Peak, which boasts some of the hardest treks in the world. It was here that the rating system was developed into the modern form that is used today.
What Is The Rating System?
 The ultimate goal of the Yosemite Decimal System was to classify certain hikes, walks, and climbs for those seeking to conquer them. The Sierra Club had a system of classification before the Yosemite was developed, but it was often too confusing for a layman who was not part of the Club to understand. It also wasn’t general enough, so those who were not familiar with certain climbs, couldn’t necessarily understand the scope that the classification was trying to aim at or describe.
As such, the Sierra Club designed the Yosemite Decimal Club, so that mountaineers and adventurers alike could understand the threat level of the endeavor they were hoping to achieve. The system breaks the hike, walk, or climb into a class and a grade. This can help beginners find a hike or climb that challenges them just enough so that they continue to grow, but not to the extent where they may seriously injure themselves. For those who are experienced climbers or hikers, it also helps them locate a new potential climb where they can really test their abilities.
The Classes
There are five total classes that walks and climbs are broken down into. Most guidebooks use this system, so you can use this article to familiarize yourself with the terminology and plan accordingly.
Class 1: Walking on an established trail that involves a low chance of injury. Hiking boots are suggested, however. Essentially, class 1 is just your standard path walk through an outdoors area. There’s nothing too demanding in regards to climbing or the trail itself. For those simply looking to begin shaping up for harder walks and tougher climbs, class 1 is always an excellent starting point to begin to trim your body and become used to the terrain.
Class 2: This involves hiking that may encounter a steep incline. It’s quite possible that you’re going to need to use your hands for balance in order to scramble up certain areas. For this hike, the proper boots are absolutely necessary. In terms of danger, little potential danger may occur. Obviously, if you lose your balance, you may fall and scrape yourself up pretty badly, so always pack away first aid materials to ensure that you can take care of yourself during the hike.
Class 3: Climbing up a steep hillside with or without the use of a rope. Normally, these types of climbs have hand and foot holds that you’ll need to utilize to make your ascent. For experienced climbers, it may not be necessary to bring along a rope unless you feel that you want to use one. For beginners, using a rope may be a good idea just to further decrease the chance of a fall. Especially since falls under this class may prove to be fatal depending on the size of the hill, your height upon the hill, and the material of the surface at the bottom of the hill.
Class 4: Climbing that is exposed. This means that there is likely a ledge you will encounter. However, there is still plenty of natural protection from the wind and other elements to be found on this climb. A rope is often used, although not necessarily for the extremely skilled climbers. The climbing itself for this class is considered to be simple or standard. Beginners should definitely use a rope for class 4 climbs as the falls from these hills are usually fatal or offer extreme injury, especially if you’re climbing alone (although you should really never climb alone.)
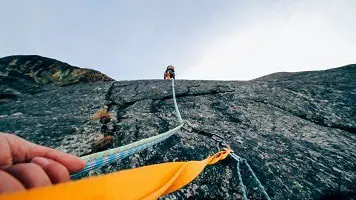
Class 5: Technical rock climbing begins here. The class 5 classification also has a series of categories to further detail the type of climb, so that mountaineers and thrillists have a better understanding of what they’re facing. Generally, however, a class five climb involves a three-point stance. This means that at all times, two feet and a hand or two hands and a foot are required to make your climb safely. Both a rope and protection are required to prevent a fall as falling from this classification of a climb can result in death. The subcategories for a class 5 climb are as follows.
5.0-5.4: There is a steep ramp or a steep section that has good holds.
5.5-5.7: The climb here is steeper but still provides good holds. It’s also easy to set up your protection here.
5.8 +/-: The 5.8 alone means that there is a vertical climbing involved that contains small holds. The “+” and “-” symbol give further detail on the slope. Although these are becoming outdated and not necessarily used in freshly published guidebooks, some of the old ones still contain them. So, they will be discussed what they mean here on the off-chance your guidebook includes them in their ratings. The “+” symbol means that the climbing is sustained like a 5.9 classification, but the route itself is still considered a 5.8. The “-” symbol means that the climb has one or two moves like a 5.8 would require, but it seems more like a 5.7.
5.9 +/-: There may be a slight overhang that you will encounter. It can also mean that there is a longer period of climbing with smaller holds. As mentioned before with the “+” and “-” symbol, it means that certain parts of the climb may resemble more of a 5.10 classification or a 5.8.
5.10 a,b,c,d: Beginning with the standard 5.10, this means the climb is very sustained. There’s a lot of it. This is where the casual climber might have some difficulty unless they are quite devoted to climbing every weekend. The letters of, “a,b,c,d” designate increasing difficulty. The difference between “b” and “c” are quite drastic. “C” will likely involve a few overhangs and areas where there are small holds or have sequential moves that must be made.
5.11 a,b,c,d: It is where the expert climbers take center stage. You can expect steep climbs and difficult routes that will involve technical climbing as well as powerful moves. Again, the increase of letter means an increase of difficulty on the climb.
5.12 a,b,c,d: Most of the climb involves overhangs that demand the climber to use delicate footwork. The holds will likely be thin and the routes will demand a great deal of balance on tiny holds.
5.13 a,b,c,d: This is an extremely difficult climb. If you can manage to climb upside down on a glass ceiling, then you should have no difficulty with this climb.
5.14: a,b,c,d: These climbs are reserved for the experts of the experts. They’re considered to be the most difficult climbs in the entire world.
5.15 a: The toughest climb in the world. Unless you have been climbing every day of your life or possess some form of superhuman ability, this climb will likely hurt you–possibly even kill you. Few have tempted it and few have likely succeeded.
Grades
In addition to the classes, the Yosemite Decimal System also has a list of grades that indicates both the length of the hike or climb and how serious the route is considered. There are seven grades all utilizing Roman numerals. If you only want to spend a morning or afternoon on a hike, learning what these grades mean could come in handy when planning your adventure.
I: One to two hours of climbing.
II: Less than half a day.
III: Half a day climb.
IV: Full day climb.
V: A climb that lasts 2-3 days.
VI: A climb that lasts 4-6 days.
VII: A climb that lasts a week or longer.
You should also keep in mind that every mountaineer and hiker is different. You may require taking more breaks than someone else, and as such, your hike may last longer than theirs. As a result, you should make absolutely sure that you have enough water and food to last a few hours or days more than what you think your hike or climb is going to last. On the opposite side of the spectrum, if you’re in great health and fit, you may end up finishing the hike or climb faster than what the grade suggested. Essentially, these are subjective and relative to the hiker in question. Understanding your pace and need to rest will help you determine how long you can expect your hike or climb to last.
Protection Rating
 Finally, an optional rating that the guidebook may or may not present to you is the classification of the protection. This determines the spacing and quality of the protection that is available for the climber. As you may consider, those who are beginners may want to select climbs that have the best protection, so they can practice working with protection on a real climb instead of in the gym which, while it certainly helps one build confidence and strength, is in a closed environment where risks are limited. The rating system used is similar to the rating system for films, so it’s pretty easy to remember.
G: Good, solid protection.
PG: Pretty good areas of protection, but there may be a few areas where protection may be poor. These ares, however, are extremely limited.
PG13: There is fair protection. Falls may occur, but if they do, they are not normally lethal or cause serious injury.
R: Runout. This means that protection placements may be few and far between. Should you fall, you may receive broken bones, even if you are properly protected.
X: There is absolutely no protection. Thus, this area is extremely dangerous and could result in death should you fall.
The Breakdown
So, what does this mean for you? Typically, gyms have climbing courses that fall no greater than the 5.12 category. They also tend to have their “easy” climbing courses range around category 5.5. If you’re interested in beginning rock climbing, then you should check out a gym that provides rock walls, and start working on your strength and agility to see what category best challenges you. Outdoorsmen might say to get out in the wild and see for yourself, but you should always exercise caution first. You need to understand your own weaknesses before you put yourself and possibly others in danger. If you find that the 5.5 course in the gym is easy, then try to find a 5.5 or perhaps a 5.4 out in the wild and see how you fare with a real climb.
It’s generally held that category climbs of 5.5-5.7s are possible for first-timers. 5.8-5.9 are for those who have regularly climbed before. 5.10s should be completed by those who climb on the weekends frequently are in excellent shape and form. 5.11 are for those who consider themselves rock climbing veterans. It’s when the category reaches 5.13 that experts in the field climb alone. Finally, 5.15 are for those thrillseekers who find rock climbing as easy as walking. With enough dedication and training, almost anyone can reach category 5.15, and since those climbs often yield the best views, the payout is usually worth it. After all, you can make history by making a climb that no one has dared to make before.
However, you shouldn’t allow your ambitions to guide you. Rock climbing is a serious venture fraught with risk–potentially permanent risk. Even if you do not necessarily die from a fall, you could severely injure yourself in a way that changes your lifestyle forever. As such, don’t test yourself overmuch until you are sure you are ready to pass it. There’s very little room for mistakes on some of the more severe climbs. Beginners should start small and see how they fare against basic climbs and then work their way from there.
Another System In The World
While the Yosemite Decimal System is the most commonly used in the United States–and has become a staple for many guidebooks–it is not the only rock climbing rating system out there. A few other countries have developed their own system, and as such, you may want to know what their rating systems look like in the event that you feel up to a bit of climbing whilst visiting the country in question. Here’s a brief glimpse of the system used in Britain, so you can have an understanding of how the two systems differ.
Easy: Rarely used.
Moderate: Sometimes known as “Mod.”
Difficult: “D” or “Diff,” are other ways it is shown.
Hard Difficult: Or “HD” or “Hard Diff.”
Very Difficult: “VD” or “Very Diff.”
Hard Very Difficult: “HVD” or “Hard V Diff.”
Mild Severe: “MS.”
Severe: “S.”
Hard Severe: “HS.”
Mild Very Severe: “MVS.”
Very Severe: “VS.”
Hard Very Severe: “HVS.”
Extremely Severe: This has additional categories in which the degree of difficulty increases. These are denoted by E1, E2, and so on.
Climb Smart
Rock climbing can be a rewarding experience. It can toughen the body as well as the mind and spirit. However, because of its dangers, caution should always be at the forefront. Understanding these systems can help you determine if the climb is right for you.
Attention: You have to take care of your safety when climbing! The information on climbtheearth.com only helps you to learn. Before you climb, you should make sure that you have been properly instructed by an expert and that you follow all safety precautions.
Disclosure: This website is the property of Martin Lütkemeyer and is operated by Martin Lütkemeyer. Martin Lütkemeyer is a member of the Amazon Services LLC Affiliate Program, an affiliate advertising program designed to enable Web sites to earn advertising revenue through advertising and linking to Amazon.com. Links marked with * are affiliate links.
