Disclosure: Links marked with * are Affiliate Links. As an Amazon Associate, I earn from qualifying purchases if you decide to make a purchase through these links – at no cost for you!
In this guide you will learn how to work on your strength and technique between your climbing sessions. There are suitable exercises for beginners as well as professionals who want to overcome a training plateau.
Climbing is a complex sport. Not only are there many ways you can do this sport, it also requires a lot of muscles. What’s special about climbing is the great focus on grip strength, for which there are many exercises and training methods – from simple to almost impossible.
Basic Tips
- Go climbing. The best training for climbing is climbing itself. If you have the opportunity, go climbing frequently to see faster progress. But always pay attention to the necessary breaks. If you are completely exhausted and have severe muscle ache, you should rest for two or three days before climbing again.
- Warm yourself up. As with any other sport, it is a good idea to warm up first to avoid injuries. It is best to do this on the ground or, if you are in a climbing hall, you can also climb an easy route at the beginning.
- Work on your mobility. You’ll be surprised how much more flexibility you’ll get from climbing. Regular stretching or yoga will help you climb.
- Listen to your body. I myself belong to the kind of person who trivializes the pain and certainly not to go to the doctor voluntarily. This is of course quite stupid. You should listen to your body and react immediately if, for example, a joint hurts again and again. This could indicate overloading or incorrect loading. The sooner you stop the cause, the less trouble you’ll have.
Exercises for Home
Grip Strength: Fingers & Forearms
Later on, you will find advanced and professional finger training for climbing – the training on a hangboard / fingerboard and the campus training. I also wrote an article about training grip strength.
But first, here are a few exercises you can do as a beginner and more advanced climber.
Hand Grippers

Since most of us can’t go to the climbing gym every day, we also need something to work on our grip strength at home. The classic solution is a normal hand muscle trainer*hand muscle trainer* – also called hand grippers. They are available in many different designs and resistance levels. If you train three times every few days with such a device until failure, you will see an increase in grip strength quickly. The advantage is that you can use them whenever you don’t need your hands, e.g. on the train, in front of the TV or when reading.
Training Grip Strength with a Pull-Up Bar

With a pull-up bar* you can train your grip in different ways. The simplest method is hanging on the pull-up bar. You can either grip the bar completely or just put your fingers over it without holding it with your thumb on the other side. The fingers and the rest of the hand take about 90 degrees to each other. If this position is no longer difficult and you can withstand it without effort for a minute or longer, you can now try a more difficult version. If it is possible, you can pull a tube over the pull-up bar, which can rotate freely. It is much more difficult to hold on to this rotating rod. If you manage to just let yourself hang on for a longer time, you can go over to normal pull-ups. But don’t get frustrated if you don’t make it at the beginning! Pull-ups on a rotating tube are very difficult and only possible after a longer period of training.
Training Grip Strength with a Rope
Another very practical tool to train your grip strength at home is a thick gym rope which you hang from the ceiling. It should be about 3 fingers wide so you can reasonably hold on to it. Here, too, you can adjust the training to your strengths. The easiest way to train with the rope is to just hang on as long as you can. If this works out well, you can start climbing up using your feet. Finally, the most difficult way to climb the rope is not to use your feet and only to climb up with your arms on the rope.
Back: Pull-up

 There is hardly a better exercise for climbing than the pull-up. This effectively builds up your muscles and grip strength. This exercise is also ideal at home, as it requires little equipment. Pull-up bars are available in numerous designs to suit every installation situation.
Execution
There are only a few important rules for the execution of pull-ups. First, the arms should never be fully extended in this exercise. A slight flexion in the elbow should always be maintained. Second, the back must be straight. A correct posture is essential to properly address the muscles in the back. By the way, this applies to every kind of muscle training! As long as you don’t dangle your legs wildly, you can’t do much wrong here if it doesn’t affect your back posture.
Now to the actual feat of strength. Pull your body up while exhaling until your chin is above your hands. Then let yourself down slowly and breathe in.
Negative pull-ups and pull-ups supported by fitness bands
If you can’t do a pull-up, try “negative” pull-ups. Negative means that one only executes the downward movement and skips the pulling up – with a chair, for example.
Another alternative is the supported pull-up with a fitness band – sometimes also called a gymnastics band. Attach one end to the pull-up bar and climb into the other end with one foot. The fitness band on the pull-up bar helps you to move up, depending on your strength, and can greatly accelerate your progress, especially at the beginning.
Pull-ups with Weights
If you find yourself in a situation where pull-ups become too easy, you can use additional weights in addition to your body weight – a weight vest* for example. Also pay attention to the permissible weight with which the pull-up bar can be loaded.
However, with additional weight there is an increased risk of injury! You should not think about training this way until you have mastered the technique perfectly.
Chest: Push-Ups
 One of the most effective upper body, chest and body weight exercises are push-ups. This exercise mainly trains the chest muscles. In addition, a number of muscles in the back, thigh and abdomen are involved in stabilizing the body.
There are many variants of push-ups. Both the degree of difficulty and the strain on the individual muscle groups can be varied by simply changing the execution.
With any kind of push-ups, you always perform the movement slowly. Most beginners perform the exercise far too quickly and thus come up with unusually high repetitions. Slow is good – even if you can do less push-ups! A push up should take at least two seconds, i.e. at least one second down and at least one second up.
Normal push-ups
To get into the right position, start on your knees and then support yourself with your hands bent forward on the floor. The hands are slightly further apart than shoulder width at chest level on the floor. The thumb points inside, the rest of the fingers to the front. To get into the normal push-up position, the legs are stretched backwards, whereby the entire body weight now lies on the hands and feet.
Pay attention to a good body tension during the entire execution. Head, shoulders, back, butt and legs should form a line together. Look to the ground. When you reach this starting position, bend your arms, breathe in and lower yourself slowly to the ground. Then press yourself up again while exhaling until your arms are almost completely stretched out again. The more consciously and slowly you move, the better. If the execution takes too long for a single breathing cycle, you can simply continue breathing slowly without a certain rhythm.
Hand Positioning
The correct hand position for push-ups is important for the training effect and the protection of the wrists. Paradoxically, the most common hand position (hands flat on the floor) is not very healthy and also does not lead to optimal training results.
The wrists are overloaded, which can lead to injuries of ligaments and tendons. The second best thing you can do is to use your fists – more precisely your knuckles of the index and middle fingers. Since this hand position can only be held with a soft pad, it is not very common, but all the better. If this is unpleasant for you, you can also use special handles*. These aids prevent overstraining and overstretching of the wrist. In addition, the pectoral muscle is trained better due to the changed posture.
Wide and Tight Push-Up
When doing wide push-ups, your hands are further apart on the floor than shoulder width. This posture increases the focus on the pectoral muscle. But you could also put your hands closer to each other, which increases the focus on the arms.
Elevated Push-Up
If you want to increase the difficulty, you can shift your weight more to your hands. If your feet are at a higher level than the hands, the weight shifts forward, which means more weight has to be lifted. Another interesting effect is that the angle of the arm-breast movement changes and the upper chest muscles are subjected to ever greater strain the higher the feet are positioned.
Legs: Squats
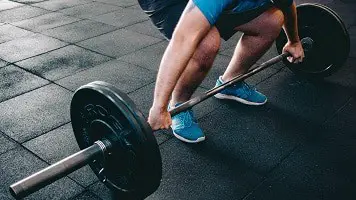 When climbing, your legs are mainly used to push you up. Therefore, squats are the ideal exercise.
Depending on your fitness level, you can exercise squats with or without weights.
Execution
The starting position of the classic squat is a little more than shoulder-wide, the feet and the view to the front. During the exercise, the body weight lies on the middle of the foot. The upper body is tilted forward enough to maintain this weight balance. The back is stretched like an arch. Now lower your body until the thighs have reached a horizontal position. The lowering movement is initiated through the hip joint. In the final position, the hip joint should be only slightly lower than the knee. The knees remain vertical above the feet.
The upward movement is initiated by the head and not the hip or butt. Just before the legs are stretched completely, the end position is reached. If the legs were stretched completely, the weight would no longer be on the muscles but on the knees.
Abs: Leg Lift
When climbing you will mainly use your lower abdominal muscles, as you usually have to pull your lower body against gravity to your upper body. For the lower abdomen, leg lifts are an excellent exercise.
Execution
For this exercise, you have to hang on to something. A pull-up bar would be ideal. Hang down with your arms outstretched and lift your legs until they are at a 90 degree angle to your upper body. At the beginning this will be difficult or even impossible. To make the exercise a little easier, you can bend your knees until you can lift your thighs until they reach the 90 degree angle to your upper body.
Keep your legs up 20 to 30 seconds for each repetition and repeat the exercise 8 to 12 times.
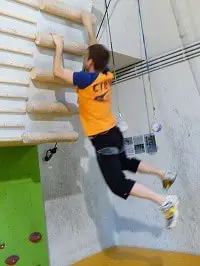
Yoga
It is no wonder that many climbers round off their training with yoga. The increased flexibility can be very helpful when climbing. Especially when bouldering, a certain flexibility is necessary to tackle difficult problems. For example, hooking with the heel off the foot is much easier when you are flexible.
The targeted stretching and strengthening with yoga not only relaxes your body, it also protects you from injuries. In general, your perception of your body improves and your balance is also trained.
Hangboard or Fingerboard Training

If you are an experienced climber, you should spend more time training the finger flexor muscles of your forearm. The fingerboard or hangboard* is ideally suited for this.
Before training on the Hangboard you should warm up extensively – about 30 minutes. This is best done by easy bouldering or normal climbing. If you have installed a hangboard at home and understandably have no climbing wall available, you have to do something else.
The methods described above (hand grippers, pull-up bar, gym rope) can be used for this. To warm up the rest of the climbing muscles, you can hang yourself on the easiest holes on the fingerboard and make a few pull-ups.
Especially with the Hangboard it is important to train with healthy fingers only. If you have an injury or are still recovering from one, you should not go to the hangboard.
Before I come to the actual training, here are a few rules on posture that need to be observed:
Activate your back when hanging by gently pulling it up and pulling the shoulder blades together.
The head remains straight, the view points forward.
The elbows are never fully extended.
The core should also be activated.
Edge Training
I recommend this fingerboard training as introductory training. You will need a fingerboard with different sized edges and pockets. Then you should test which one you can hold on to for about 15 seconds. The holding time during training should not exceed 12 seconds and you should never hang until the muscles fail.
A set should consist of five 12-second runs, with a two-minute break between each. Start with two sets with 3 to 5 minutes break. Advanced climbers can make a total of 5 or 6 sets aimed at ever new grip positions. The difficulty should be set in such a way that the 12 seconds can still be reached during the last run without the muscles failing.
As time goes by, you will become stronger and stronger, allowing you to use increasingly smaller edges and pockets.
Finally, the edge training makes you so strong that the holes you hold on to become so small that the training hurts. When you have reached this point you should go over to putting weights on your climbing harness.
Edge Training with Weights
This workout uses more comfortable and larger grips, but with either a weight vest* or weights attached to the harness. Start with a comfortable edge and choose a training weight that is so heavy that you can hold on for 10 seconds without failure. You have to try a little to find the right weight.
The training plan I recommend is to hang for 7 seconds and then rest for one minute. A set consists of three rounds. There is a 3-minute break after each set. If you haven’t done edge training with weights, I suggest only two sets two days a week.
Advanced climbers can do more sets, but only two days a week. This training puts a lot of strain on the muscles. So you shouldn’t do it before a competition or a climbing session on the rock face.
To build up your strength, you gradually increase your weight. But you always have to be careful never to hang on the hangboard until failure.
If you go through the training consistently, after about four to six weeks you will reach a plateau where you will no longer gain any strength. Once there, you can concentrate on other areas of your body, such as strength endurance. The training on the fingerboard should then not be done as often as before and not with such intensity any more, because from now on you only want to maintain the acquired strength.
If you want to become even stronger, you should try campus training!
Campus Training
 The Campus Board is a training wall with many rungs (like a ladder) that are completely impossible for beginners to grip. Therefore the campus training is only suitable for advanced climbers. So – skip this chapter if you’re not a professional!
The goal of training on the Campus Board is simple – Power!
With Campus Training you can train your strength very quickly and measurably. Especially the explosive part of the movement and the rapid build-up of tension is trained by the Campus Board.
However, you should not think about training on the campus board until all of the following criteria apply to you:
- You have reached a plateau and are not making any progress in your strength training.
- You have no injuries or recurring pain while climbing.
- You’ve been climbing for two years.
- You can easily do 10 pull-ups on one rung
If you do not have your 2 years of experience and training, you will overstrain your muscles and tendons with the training on the Campus Board! As long as you are not at this point, normal climbing and the other training methods in this article are perfectly sufficient to improve your skills. Really! Don’t try it!
If you start campus training too early, with immature technology, you will get hurt!
You’re still here despite the warnings and you meet all the criteria? Well, then I will now go into the actual training.
 Campus Training – Basics
- The hand must always be “open” when gripping. The index finger is almost straight and the thumb does not participate at all. Your finger joints must not be higher than your fingertips. If you grip too tight and your fingers are more closed, you will destroy your tendons.
- Always go fresh to the campus board. Except for a slight warm-up, you shouldn’t do anything else before campus training. To warm up you can climb easy boulder routes and stretch and mobilize properly.
- Be motivated! Since campus training is very strenuous, you should bring enough motivation and energy so that you don’t give up too soon.
- Take a break of about 2 minutes between sets.
- Technique is priority number 1! As soon as you notice that your form is weakening or you try to use momentum to reach higher rungs, you should stop.
- Unlike other strength exercises, you should stop campus training before you are completely exhausted. If your forearms are completely burned out, it can take a long time before you are fit again and can climb or train at a high level again.
- Training with weights is only for absolute professionals who know exactly what they are doing and have been training on the campus board for several years.
- At the beginning you should only integrate the campus board into your training every two weeks. If you have become stronger and are comfortable with the movements, you can switch to weekly.
The Correct Grip
 As already mentioned, it is extremely important to have the right grip during campus training. The forces acting on the tendons and joints in your fingers can be really enormous. A wrong grip can lead to injuries or, in the long run, to wear and tear and permanent discomfort.
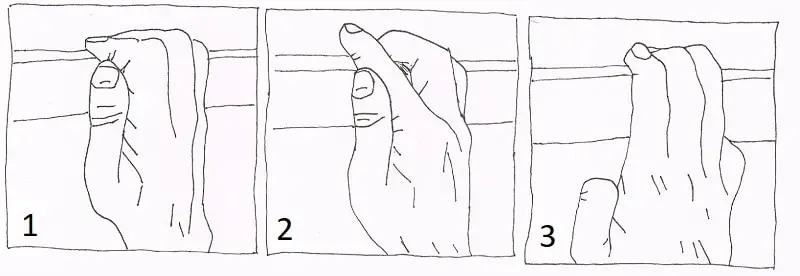
Figure 1 shows the normal “half-crimp”, which is slightly more difficult than the campus half-crimp. With the normal half-crimp, the index finger is also bent by 90°.
In figure 2 you see the “campus half-crimp”. The index finger is straight, the middle and ring fingers have an angle of 90° and the little finger is either straight or slightly bent.
Both half-crimp grips are very well suited for training on the campus board. They recreate realistic climbing situations and train your forearms very well.
The “open-hand grip” is suitable for training very small grips or edges (Fig. 3). Only index, middle and ring fingers are involved and only the last joint is flexed. This grip requires a little more strength for most people, so use it carefully and certainly not before you have trained it on the fingerboard or hangboard!
Strength Exercises on the Campus Board
There are many exercises you can do on the campus board to increase your strength. Once you have made your first experiences, you can put together a campus workout from the following exercises:
- Deadhangs: To start with campus training, there is nothing better than just hanging yourself on one of the rungs. Hang from a rung for about 10 seconds and then rest again for 10 seconds. If you can do this with the simplest rungs, you can continue with the heavier ones.
- Pull-Ups: Yup, regular pull-ups. Take care of the right grip! The pull-ups prepare your body for the more difficult exercises on campus training.
- Jump and Hang: As the name says, just jump on the rung and hold on. This trains the impulsive power, which must be available immediately.
- Laddering: In principle, you climb up the ladder rungs one after the other without using your feet. Your hands never grab the same beam. The technique here is as follows: You reach up with the lower hand with a quick movement and then pull yourself up by both arms until you jump up again with the other arm to reach the next rung. Increase the difficulty by skipping rungs or choosing smaller ones.
- Hits: Hits is the same as laddering, except you don’t hold the top rung, just touch it and then drop again. Hold on to a rung with both hands. Then pull yourself up and touch the next rung (or as far as you come). Then drop down again and pick up your weight with both hands on the lower rung. Of course you should switch hands here every time.
- Bumps: Hold on to the lowest rung with both arms. Then grab the next rung with one hand and the next immediately afterwards (always with the same hand). If you don’t get any higher, go back the same way and repeat with the other hand.
Improving Technique
To become better, not only physical training is necessary – you should also continue to refine your technique. Our muscle memory helps us a lot with our technique. With every movement you program your subconscious motor skills. The more often you perform a certain movement, the easier and faster it becomes.
However, our muscle memory only works up to a certain point and can even be counterproductive in some cases. If you make a movement wrong from the start, you program your muscles wrong. Getting rid of these bad habits can be very difficult. To prevent this, you should watch your movements as early as possible and correct them if necessary so that they burn into your muscle memory correctly.
So when training the technique, there are basically two goals you want to achieve with the training:
- Practice and perfect new techniques.
- Eliminate bad habits.
I have noticed that I improve my technique faster when I climb together with others. Others can show me my mistakes and I can look at their technique and learn. It is also advisable to test new techniques or ideas on simple routes before applying them on harder ones. If you are climbing on a difficult route and try something new with success, a bad execution can quickly creep in.
In every good climbing gym there is a training area with finger boards, campus boards and other training walls. These so-called system boards are ideal for training your technique.
System Board
A system board is a wall with a lot of handles, sometimes the handles are so close together that they touch each other and nowhere would be room for another one. The handles are always doubled or mirrored. This arrangement allows you to practice your technique on both sides.
The difficulty of the grips usually ranges from medium to professional, so that everyone can train on the wall and you can continue to improve. If every grip is too difficult for you, you should first work on your strength and practice your technique during normal climbing or bouldering.
When training, always make sure that both sides are under the same load. If you have practiced a move on the right side three times, you should also practice it on the left side three times.
Training on the System Board is always useful if you want to improve a certain movement or a certain weakness of your technique. So the best thing to do in advance is to know exactly what situation you want to recreate and practice. With me it is always the situations or problems in which I fail again and again. When that happens, I memorize the obstacle and try to reconstruct it as well as possible on the system board.
The nice thing about the system board is that you can see your progress directly. As you get better, you can increase the number of repetitions, the angle, the extra weight or the radius of movement. At the beginning, however, the speed should only be reduced. The slower you perform an exercise, the more difficult it becomes and the higher the training stimulus for the muscles.
Create a Training Plan
I have been interested in physical fitness for a long time and have not only been looking for exercises and expert advice when climbing. But one thing was the same in every area – no training plan worked correctly. Every body is different and you have to learn to understand the signals of your body.
Instead of saying “on this day I do exercise X and the day after that I do 3 sets of exercise Y”, you should think about priorities. Where’s your weakness? Which muscle group is ready to be strained again? Does a joint hurt?
These questions and the honest answers to them will give you the perfect training plan. If you want to strengthen your grip as priority 1, you should do Hangboard training as often as your regeneration allows. If you are satisfied with your strength, you can work on your flexibility or improve your technique.
Keep your training versatile and flexible. Basically the following rules apply when you set up your own training plan:
- The muscles do not grow during training – there you only give them the stimulus for growth. Allow your muscles to regenerate sufficiently so that they can become stronger.
- Eat a healthy diet!
- Lots of sleeping and drinking!
- No training with pain!
Mental Training
Many climbers believe that mental training is at least as important as physical training. When climbing you need a clear head. You have to stay cool in difficult situations to make the right decisions.
Fear is a very intense emotion that can affect us when climbing. It can weaken or even paralyze your concentration. But fear will never completely disappear – and that’s a good thing, because it tells us when we go beyond our limits and when we have to double our attention and concentration.
Besides coping with your fear, there are other ways you can prepare for the upcoming climbing. Know your route, go through your equipment, plan your first steps and concentrate on the present!
Fear of Heights – The Fear of Falling

In this article, I have put together methods to help you reduce your fear of falling.
Fear of falling is an instinctive reaction of the human body to warn us of danger. However, it is not easy to tell our subconscious that we are hanging on a climbing rope!
Your subconscious doesn’t learn this through logical arguments – you have to show it to it. In my opinion, the best way to lose the fear of falling when climbing is to provoke falls and practice them. It is best to go to a climbing gym and let your climbing partner know what you want to do.
You lead climb, so you always clip the climbing rope into the next anchor on the climbing wall, and let yourself fall consciously on your route every now and then. At the beginning still close to the ground and near the last anchor. Then you go further and further and at the end drop right in front of the next anchor to drop the biggest possible distance.
This method is very successful but also quite radical. It depends on how badly you’re afraid of heights. If your fear is very strong, you can also start bouldering.
When bouldering, you climb close to the ground without a harness and rope. The floor is covered with soft sports mats so that you can fall without worrying.
Fear of Failure
Perfectionists and ambitious people know only too well the fear of failure. Of course, this fear is also widespread in climbing, as the border between success and failure is so clearly visible when climbing. If you fail at a certain route, your grip strength is lacking or your fingers don’t play along – the consequence is always that you don’t reach the top.
To deal with these failed goals, you should first analyze your goals. Are they too high? Aren’t you ready with your training yet? To move forward, you have to learn from your mistakes and work on your weaknesses. You can’t grow without making mistakes or failing! Exactly this principle is the recipe for success of every athlete. Of course, it also requires good genes, hard training and an appropriate diet, but digesting defeats is at least as important.
Defeat your Ego!
For beginners it is important to say “you can do it”, but it is also important for advanced climbers to know when you have reached your limits. When your ego tells a climber that you must get over the next obstacle to avoid embarrassment, it can quickly become dangerous.
Experienced climbers know that the way is the goal. Climbing is such a beautiful sport and should not be result-oriented. Especially since every climber is different, you shouldn’t measure yourself against the performance of others. You can admire and strive for great achievements, but you cannot punish yourself or feel bad if you do not achieve them. This would cause your ego to push you beyond your limits, which can lead to injuries and accidents.
Plan your Route – Check the Beta
Whether bouldering, sport climbing, traditional climbing, top rope climbing or other types of climbing, it is advantageous to plan your steps in advance.
When I first went to the climbing gym and made my first “walking attempts” while bouldering, I immediately noticed the veteran climbers who spent their breaks staring at the wall between their attempts.
On the same day I adopted this behavior because I noticed that I can make a route safer and faster if I know in advance how to place my hands and feet and where the best route is.
But this is not only important for bouldering. Even on a rock face where you can’t see the entire route from below and plan ahead, you should pause and think in between. This also helps you tremendously to concentrate. Of course, this does not mean that you may enjoy the view!
Stay in the Present- the Concentration
The more you climb at the limit, the more concentration you need. Sometimes it is not so easy to stay in the present and with the current problem.
Our brain can sometimes be very loud and think it’s a good idea to think about absurd things in the middle of a climbing route in front of a difficult obstacle. Climbing can be a very meditative activity, as the movements are quite slow. The danger is always that one does not stay 100 percent with the matter at hand.
Watch your thoughts. If you want to improve your concentration, pay attention to what you are thinking about next time you climb. Of course, monitoring your thoughts also weakens your concentration, but this is the only way we can train ourselves.
Just as dangerous as daydreams when climbing is the early celebration of an overcome obstacle. Save your jubilation for the end of the route so that you don’t lose sight of the essentials in between.
Attention: You have to take care of your safety when climbing! The information on climbtheearth.com only helps you to learn. Before you climb, you should make sure that you have been properly instructed by an expert and that you follow all safety precautions.
Disclosure: This website is the property of Martin Lütkemeyer and is operated by Martin Lütkemeyer. Martin Lütkemeyer is a member of the Amazon Services LLC Affiliate Program, an affiliate advertising program designed to enable Web sites to earn advertising revenue through advertising and linking to Amazon.com. Links marked with * are affiliate links.
